Monday, June 25, 2012

My New Obsession...

So today I thought I would do a tutorial for you. I want to show you this highly addictive beginner quilting project. You do not need all the supplies a normal quilt might require. I did not invent this but wanted to share it my way :)

You will need:
Scrap fabric
Sheets/ Dryer sheets any big fabric you no longer need
Sewing machine
Iron

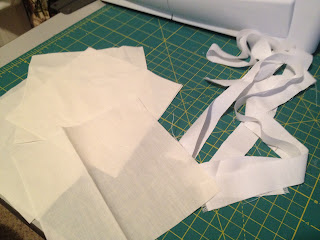
First you want to decide on your colors, for this tut I decided to just do random scraps nothing specific. Then take those and cut into strips, now this really not hard but make some longer at least long enough to go diagonal across the size of square you want. Now get to cutting...


As you can see your strips dont need to be perfect or straight or equal length etc. It is so fun to start from imperfections and it ends so beautiful! 


Second you will want to take your sheets or dryer sheets whatever you have chosen for the foundation of your squares (you will not see this)


Pick a color for centers of squares. I like to keep the center line uniform through all squares so I use white. In the end this will create a great design.


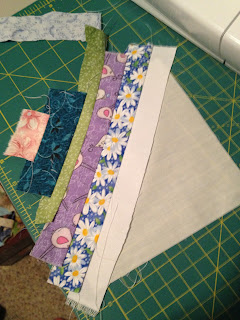
Now that you have some scraps take the center color and lay it in the center of the square next lay the color you want next to that on top on the white face down and sew along those lines.


Now Iron that open 


Keep repeating for that side of the center line 


Halfway there :) 
Now repeat the same steps for the opposite side 


Now you have a square covered in scraps!


This is my favorite part! You will turn over your square and cut all the excess scraps off


Now you can see how pretty it is! 


These are so addicting and go so fast! And since we are leaving the foundation piece it will make such a warm lovely quilt! 
As soon as I get a few more squares I will post the different variations of placement with these! 

Tuesday, June 19, 2012

Wallet


I have been sorta ignoring my craft room, constant interruptions are so hard when working on something big. But today I decided to make a fast project here is my wallet. It is not perfect actually could use lots of tweaking but its cute and I got something done. 


Heres the front (I know bad pic I will try and get a better one) 


Here is the inside. 

Saturday, June 16, 2012

Meringue Cookies YUMMY

So today I am taking a small break from crafts well kinda now that its after noon. I have decided to make meringues for my husband also to practice for a friends baby shower coming up. They are a great little snack! In case you haven't had them they are very light and well kind of taste like a marshmallow, well kinda not. You can buy these at your local bakery if they look good but you dont want to make. They are time consuming but so worth it! Anyway on to the recipe:

You will need:
3 large egg whites (at room temp, although mine never are but they suggest so)
1/4 tsp of salt
3/4 C of fine sugar (I just put it in a food processor but not sure if it really makes a huge difference)
1 tsp Vanilla extract or other flavor
*You can use a piping bag or just spoon it on
* Optional food coloring (Who doesn't want food coloring?)
Parchment paper
And the other things you should have like a wisk and an oven :)

First you will want to pre heat your oven to 200F
Then you will want to beat your egg whites until foamy
Next add your salt
Beat on medium speed until when you take the wisk out and it forms slumpy peaks (you'll know what I mean)
Then start adding your sugar 1 tsp at a time while beating on medium speed
Once all sugar is added add flavor and coloring if desired
Beat on medium speed until all is blended well together and it will turn shiny and now when you know it is ready is when you stick your wisk into the egg whites/sugar and pull it out you will have peaks that don't slump over.
Once you have those nice peaks you need to line your baking sheets with parchment paper (not essential but does help for removal. Then you can either fill your piping bag or just spoon your mix on to the parchment paper. Stick in oven and depending on your size let cook for 1hr to 1.5hrs mine are about 2in and take about an hour. You will know when done because if you touch one it will be nice and crisp. Once they are crisp you can crack the oven door and shut it off. Let them cool in the oven for a few hours. Now you can enjoy! * Now for my first batch I was so excited to see how they came out I did not let them cool for hours I ate some right out of the oven and they were delicious, however letting them cool will let the inside continue to cook a little.


Here is a pic of mine now this is like my second time using a piping bag so no judgement please. :) I have a lot of practicing to do.

Wednesday, June 13, 2012

Monday, June 11, 2012

Afghan/ Throw

For the past few days I have been working hard on this new throw. It is approximately 3ft now. I was planning on making it larger but I think a few more rounds and I will call it good. 


Tuesday, June 5, 2012

Marker pouch

Today I used a tutorial I found here:http://craftygemini.blogspot.com/2012/05/zippered-box-pouch-tutorial.html

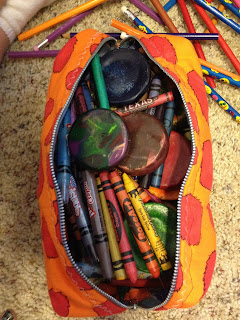
Its a great tutorial on how to make these super cute Zipper pouches. Now alternating theme of fabric you can make these for anything. I used mine for my kids. I made one for the markers then my son had to have two more for his pencils and his crayons. Here are my first two I suppose tonight I will be working on the third. But anything for my babies! 


They stack perfectly (aside from the crayon one being way too full) 

Wall hangings from magazines

So today I thought I would share an idea i had because I have sooo many old magazines but cant seem to let them go to the garbage. So first you will need one magazine for each "diamond" you want. For the larger ones fuller magazines work or you could glue two together. You will need glue or mod podge and some sort of hook. 
You will want to tear out any inserts or if there are perfume ads.
Lets begin folding, you will take the top right corner and fold it in as seen in this picture, then take the bottom corner and fold it up to make the triangle. You will keep going in same fashion. Keep the front and back cover on for stability. You will fold both of those in same fashion. Keep in mind while doing so they may not be exact and thats fine it wont be a huge difference. 


Take top right corner and fold it down into center ish.


Then take the bottom right corner and fold it upward until forming a triangle. 


Here is the other side once page is turned. 


Keep going.


It wont take long to see it taking its form. 


almost done!


And done folding in about 20 min! 

Now we need to stabilize to hang it up.


Take the back two flaps (the covers) lay flat on cardboard and trace around it.


Then cut it out.


Use glue or mod podge and glue those two cover pages to it.


Let dry completely. 


You can kinda see the cardboard but I wasnt too worried. You can always cut these off if it bothers you.


I let mine rest like this for a few to make sure it got glued all the way. 


I used a cheap wire which didnt hold too well so I suggest using a strong wire. Maybe an old wire hanger.


Cut into smaller pieces. Enough to make loops and enough of a tail to secure down. 


Form wire into loops.


Now probably out of pure laziness I used cheap ol masking tape. Dont suggest doing so. I suggest Duct tape for sure!


Heres a close up


Then I use just tacs in the wall and hang up my loops! A great cheap way to spruce up your craft room or any room for that matter. Different magazine sizes will make a diamond that is as tall as the spine. I think I might make some more and spray paint them to see what other kind of looks you can get. Its a great way to reuse those old magazines! Let me know what you think!